


So, you’re thinking of opening your own restaurant and getting involved in the hospitality industry?
Investing proper time and attention to the design phase of your restaurant or cafe is a vital component necessary for success in such a competitive industry.
A well-planned professional kitchen is at the heart of a successful hospitality operation. Granted, we might be slightly biased!
As you’re developing the look, feel, and efficiency of your commercial kitchen, design changes are common. Ideally, you’d catch the unwanted design errors before installation.
Why use the Kitchen Design Tool?
Design chaos can be avoided; however, preparation is key.
Our free kitchen design software simplifies the process of designing your commercial kitchen. It allows you to build a virtual design utilising the modular Simply Stainless system, so you’re as prepared as possible for any unexpected issues in your project. To put it simply, our online kitchen design tool will make your planning process stress-free.
Use your smartphone, tablet or computer to access our Kitchen Designer tool – we’re compatible across all devices (refer to our Quick Tips at the end of our guide for more information).
Design your own kitchen layout by following our easy 12-step user guide to designing the best commercial kitchen.
1. Create Kitchen Designer Tool login
Create a Kitchen Designer Tool login using a username and password of your choice.
This online login gives you complete access to all of our kitchen design software – to save designs, request quotes, generate 3D concept views, download and print your designs as needed, etc.
With your account, you will always have access to your saved design at any point in time.

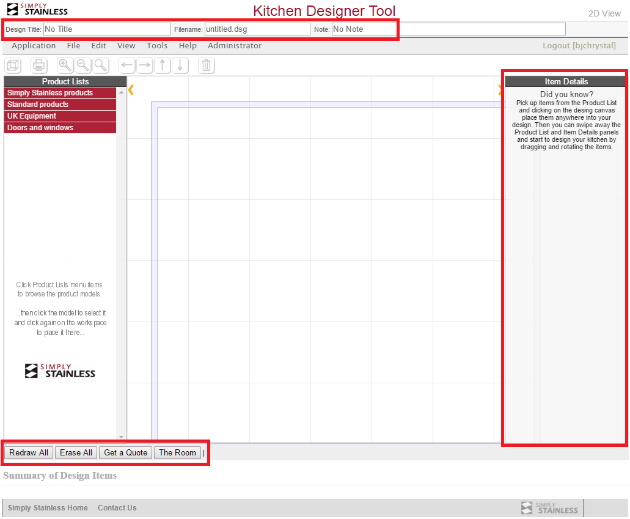
2. Name your Design, Allocate a Filename and add Project Notes
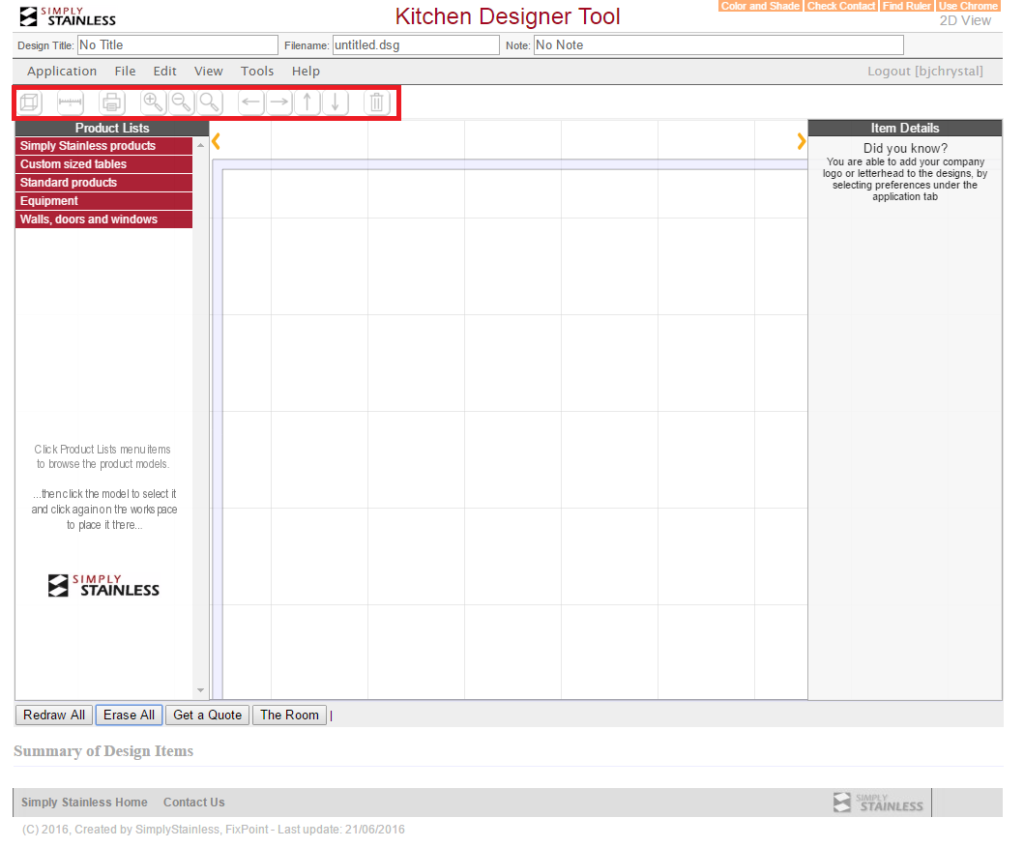
In the top toolbar, set your Design Title in the input field. Allocate a Filename and any short project Notes here.
The Bottom Toolbar enables you to:
- Redraw your current item
- Erase your current design and begin again
- Get a Quote from the nearest distributor
- Use The Room icon to adjust the wall dimensions
Item Details will display helpful hints when no item is selected. Each click presents a new hint.
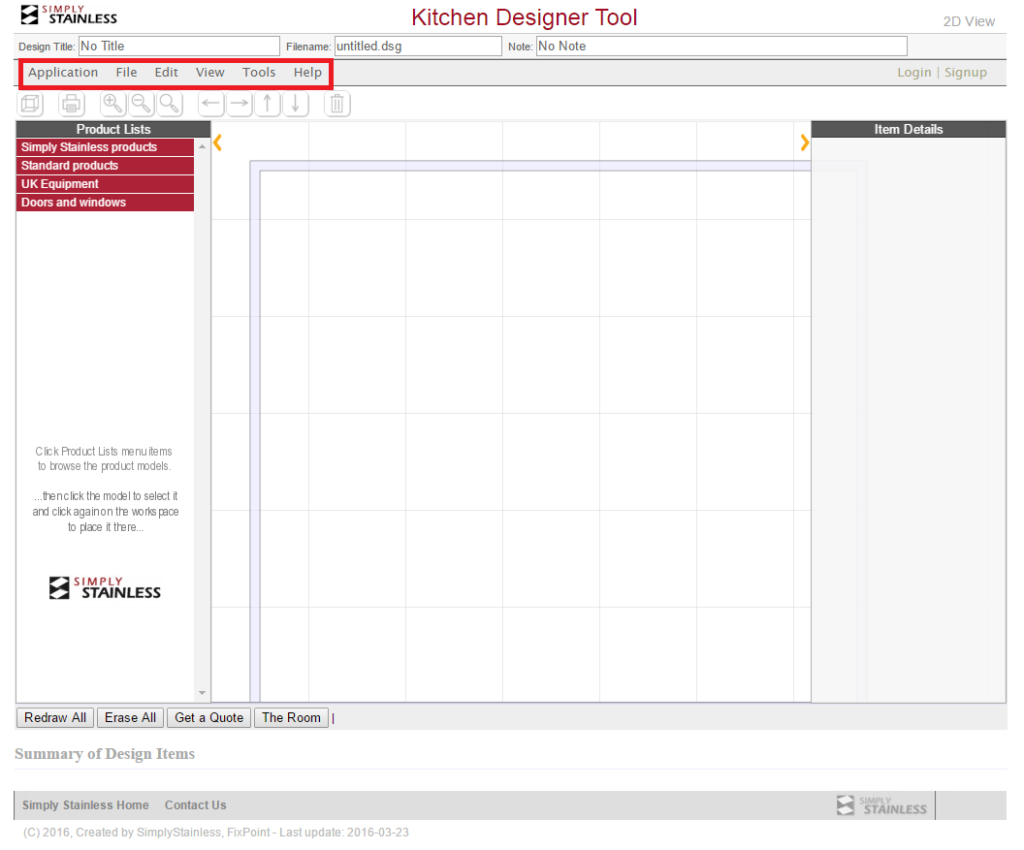
 3. Toolbar use: Application, File, Edit, View, Tools, Help
Use the top left-hand toolbar to access:
- Application: About, Set Preferences
- Upload company letterhead/logo into designs by selecting preferences & uploading image to appear on all print outs and emailed designs
- File: Open existing designs, Save current design, View print screen & Print, Get quote
- Edit: Delete & duplicate
- View: Toggle 3D/2D panel on/off, toggle view perspective
- Tool: Change camera position
- Help: Access help documents and online videos
4. Canvas Image Icons
Image icons in the toolbar facilitate movement around the canvas.
- Mode: Switch from 2D to 3D mode
- Toggle Ruler: Provides point to point distance
- Print: Print design sheet in 2D
- Zoom Function: Zoom in, out or set to default
- Pan: Pan elements Left, Right, Up, Down
- Bin: Discard elements from your canvas
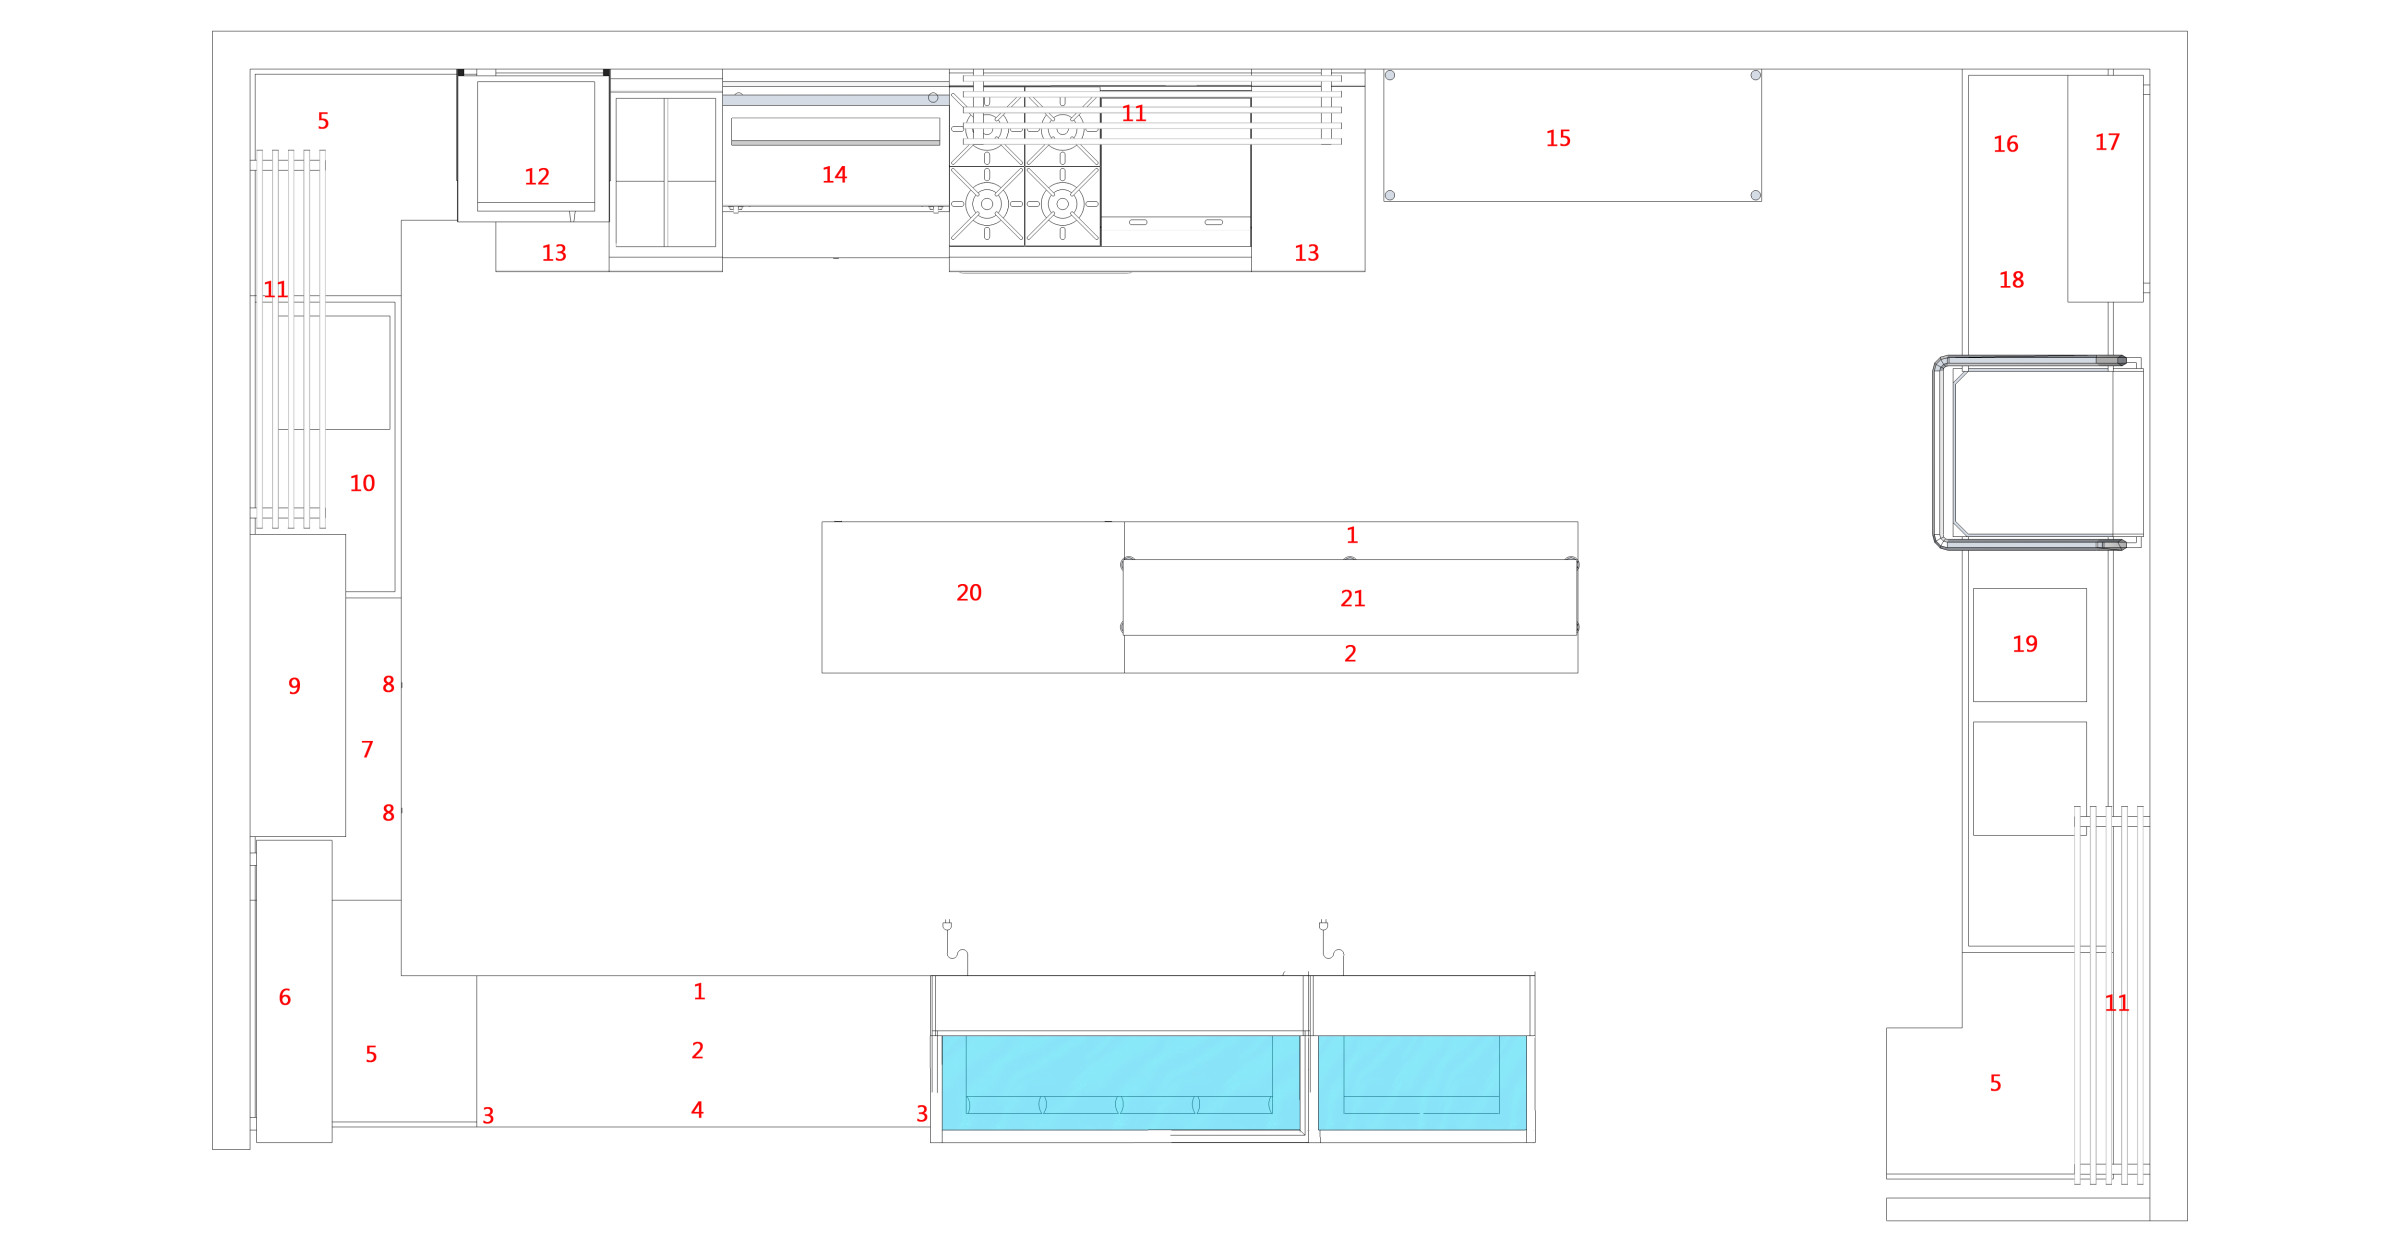
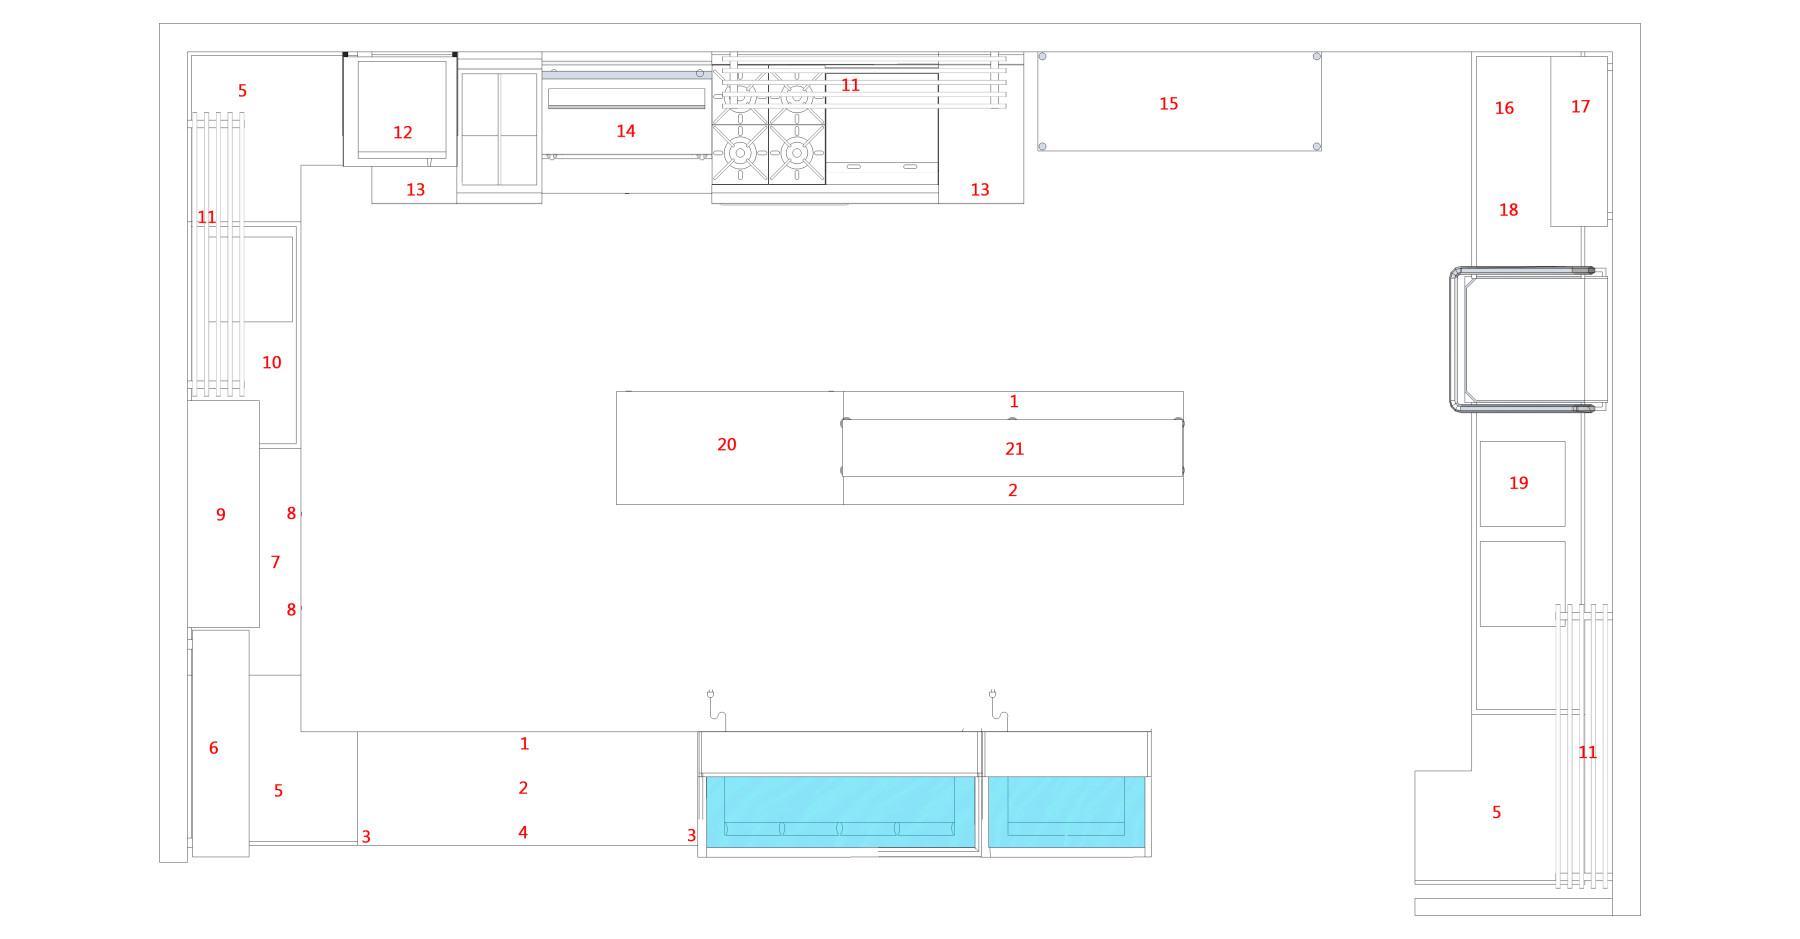
5. Where to Access Equipment and Technical Drawing Sheets for Your Design
All Simply Stainless products and standard kitchen appliances are accessible on the left-hand panel under Product Lists. Within this panel you can access the following:
- Simply Stainless Product
- Custom Sized Tables
- Equipment
- Walls, Doors and Windows
You can also load doors and windows into your design so long as they are being placed on existing walls you’ve placed on the canvas.
Pick the product list you would like to access, select your category of choice, and then choose your equipment. Click where you would like the selected equipment on the canvas and it will migrate across automatically.
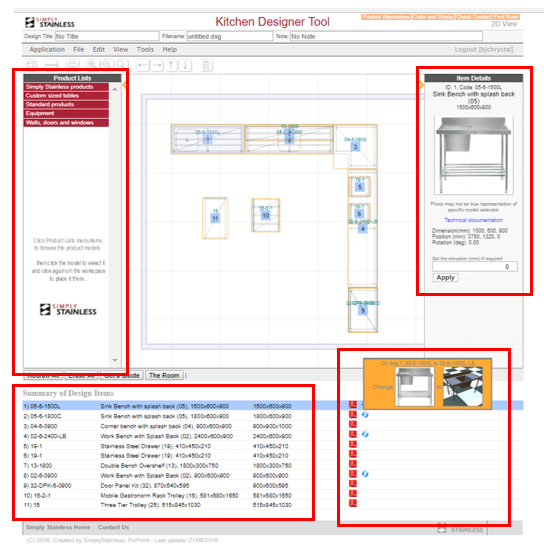
The Item Details bar on the right-hand panel displays the following critical information on your selected.
- Product Image
- Item Code
- Link to pdf technical drawing sheet
- Dimensions of the unit
- This panel allows you to adjust the height of the unit. All items specific to the selected unit will default to a predetermined height (e.g. 670mm for 19-100 drawer system).
- Ability to change elevation of selected unit
- Important notes regarding design restrictions and recommendations or specific unit placement
The Summary of Design Items lower panel displays a live table of all items placed on the canvas.
- For quick reference, each item on the canvas has a corresponding number to the unit listed in the summary.
- PDF icons adjacent to the corresponding numbers give you access to the specification sheet of the selected item.
- To change your standard undershelf to a leg brace, hover over the Blue Arrows with your mouse and click on the image that appears referencing Change.
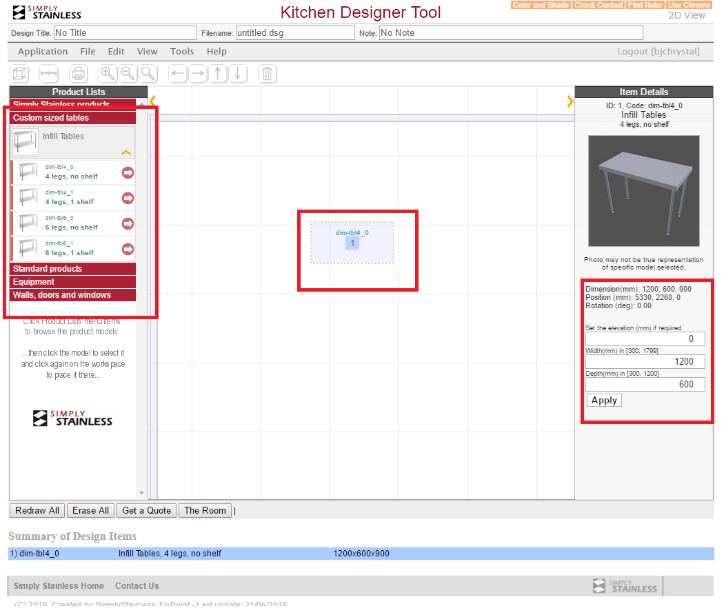
6. Modifying Equipment Size and Position to Suit Your Design
Follow the process below to place equipment on the canvas and adjust sizing to suit your design.
- Select Custom Sized Tables (for example) from the Product Lists Toolbar and choose which configuration is needed
- All Simply Stainless product and custom sized tables render in complete 3D detail
- If you select custom equipment from the Product Lists toolbar, the equipment will render as a standard box based on your nominated size.
- Place the unit on the canvas and adjust the dimensions via the Right-Hand Toolbar
- You can modify table sizes as needed to fill a specific space (e.g. when designing a run of tables that are wall to wall)
- Customise the size of your equipment by selecting “Custom Sized” from the drop-down menu once your equipment has been selected from the left-hand toolbar.
- You can also customise the dimensions via the right-hand toolbar in the same manner as modifying the equipment dimensions.
- To Rotate items, continually click either side of the product to achieve rotation in your desired direction.
- To Move equipment, select product, hold to drag and release hold of the mouse to place product in the desired position.
- Equipment positions can only be modified in the 2D view, not in 3D view.
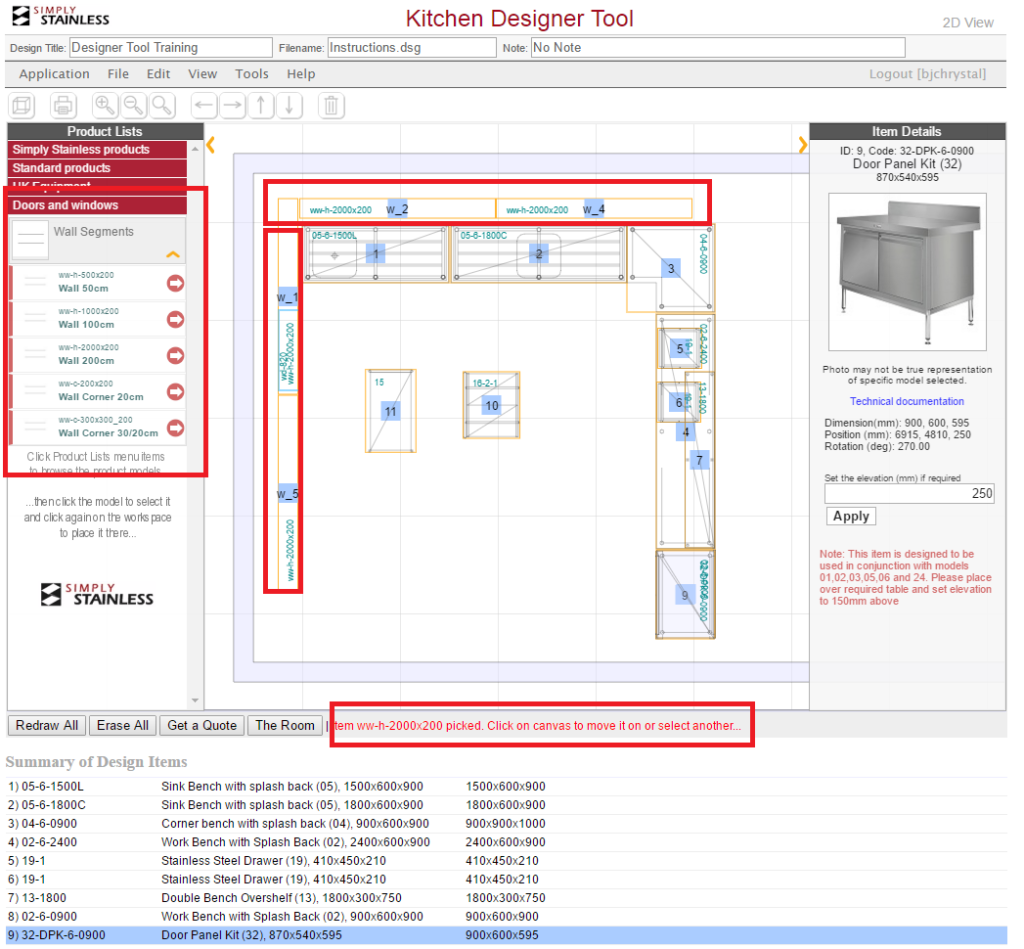
7. Adding Walls, Windows and Doors to Your Design
1. Selecting the Doors and windows category from the left-hand column and then your wall segment of choice to place on the canvas.
2. Any walls you put on the canvas yourself will remain as a transparent fixture unless they are removed/modified via the 2D view.
- Default walls can be removed only via the 3D views.
3. Doors and windows (which default to a height of 950mm AFL) must be placed over the top of a wall segment on your canvas.
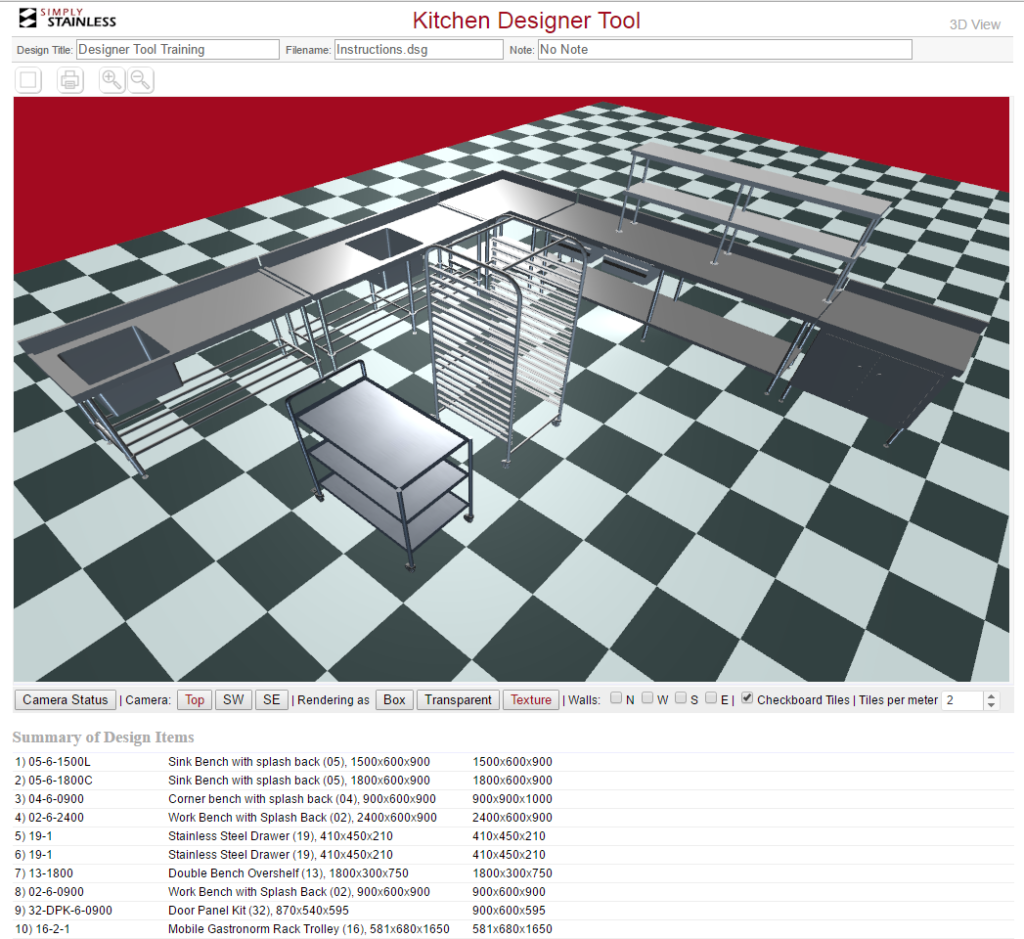
8. 3D Conceptual View
- Select the 3D toggle box in the upper left-hand corner or via the 3D View tab on the toolbar once your design is ready.
- Allow the screen a few seconds to load and display your 3D render.
- To view the canvas in Full-Screen Mode within this 3D display, select the icon in the upper right-hand corner of the canvas to expand the image.
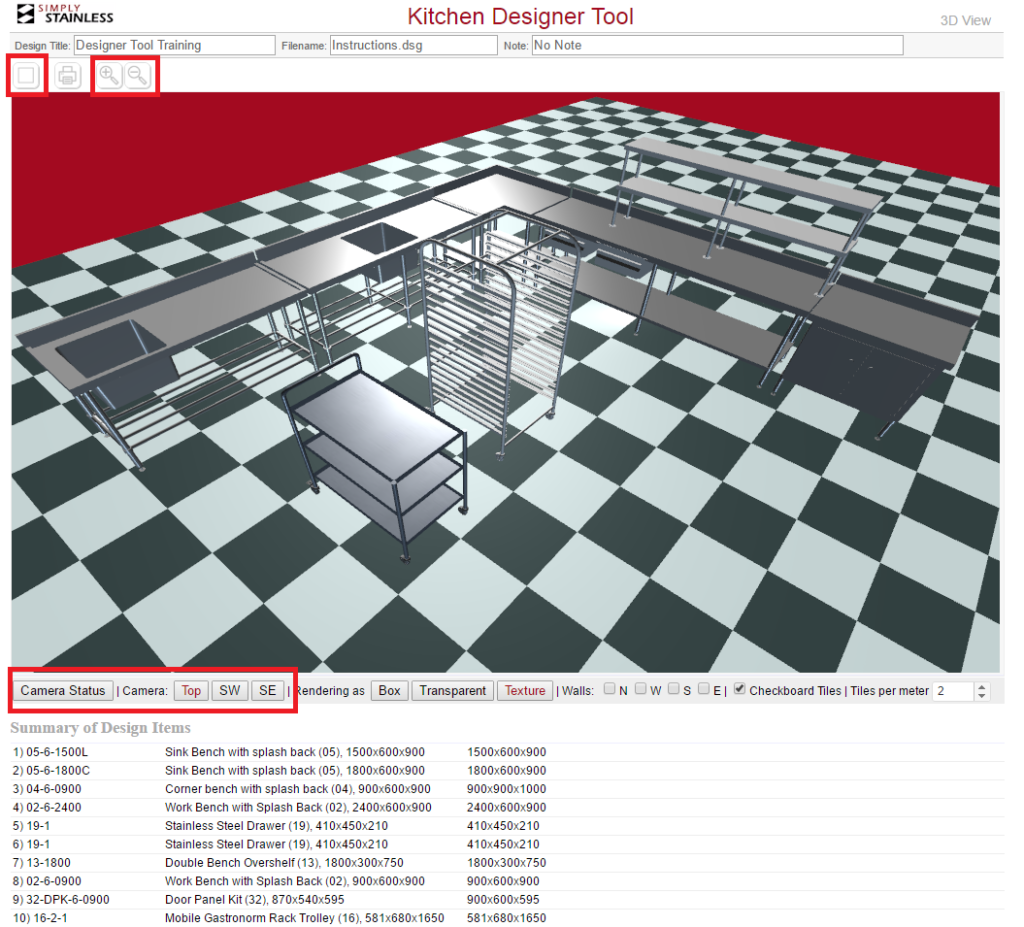
9. Amending the Camera Position for your Design
Use any one of these methods to adjust the camera position while in the 3D view.
- Right-click your mouse to hold the screen and move the camera angle and left click to adjust camera position. Use the mouse’s scroll function to zoom in and out of the canvas.
- Select the Camera icon to revert to top default view.
- The top left toolbar will take you back to the 2D view for editing, and the magnifying glass icons work in the same way as your middle mouse scroll.
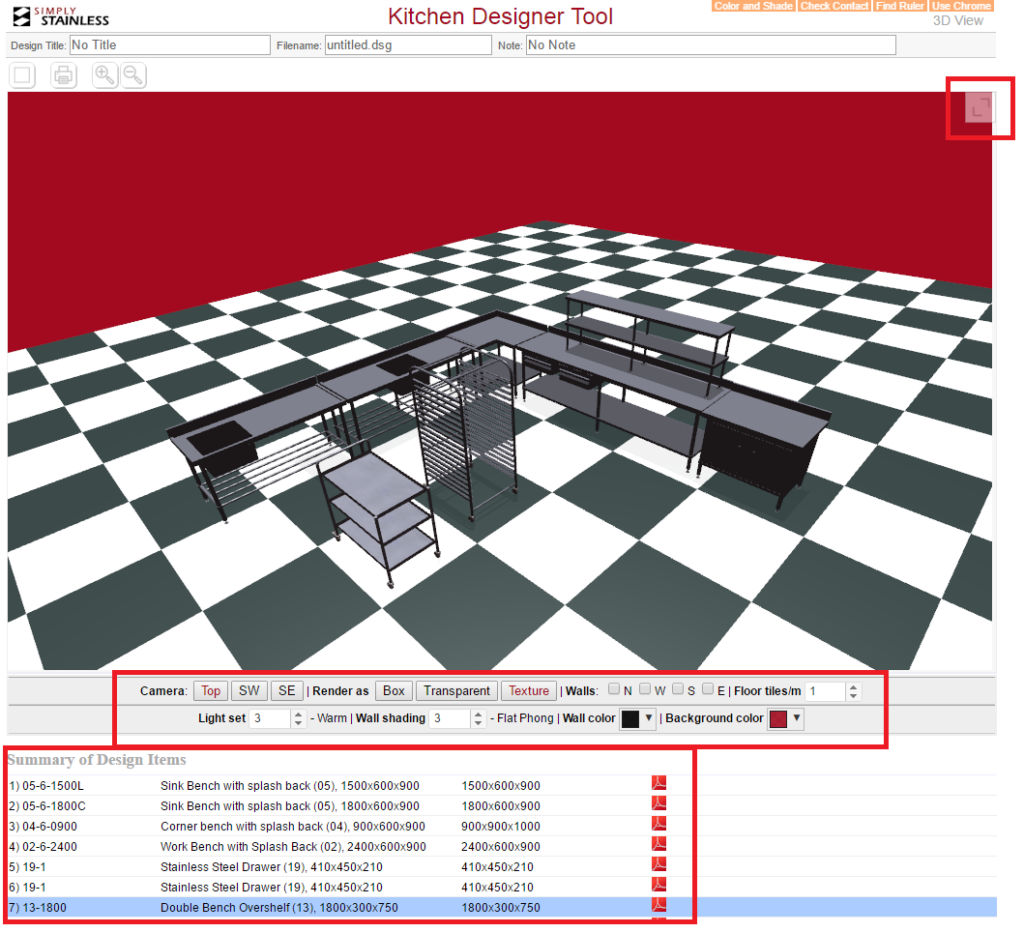
10. Modifying Equipment and Wall Appearance on the 3D Canvas
Change the Render on the items by selecting the following:
- Box: Transparent box shape
- Transparent: Transparent item shape
- Texture: Realistic render
- Walls: *See step number 7
- Floor Tiles: Adjustable checkerboard tile floor finish
- Light Set
- Wall Shading
- Wall Colour
- Background Colour
See step 5 for more information on the Summary of Design Items.
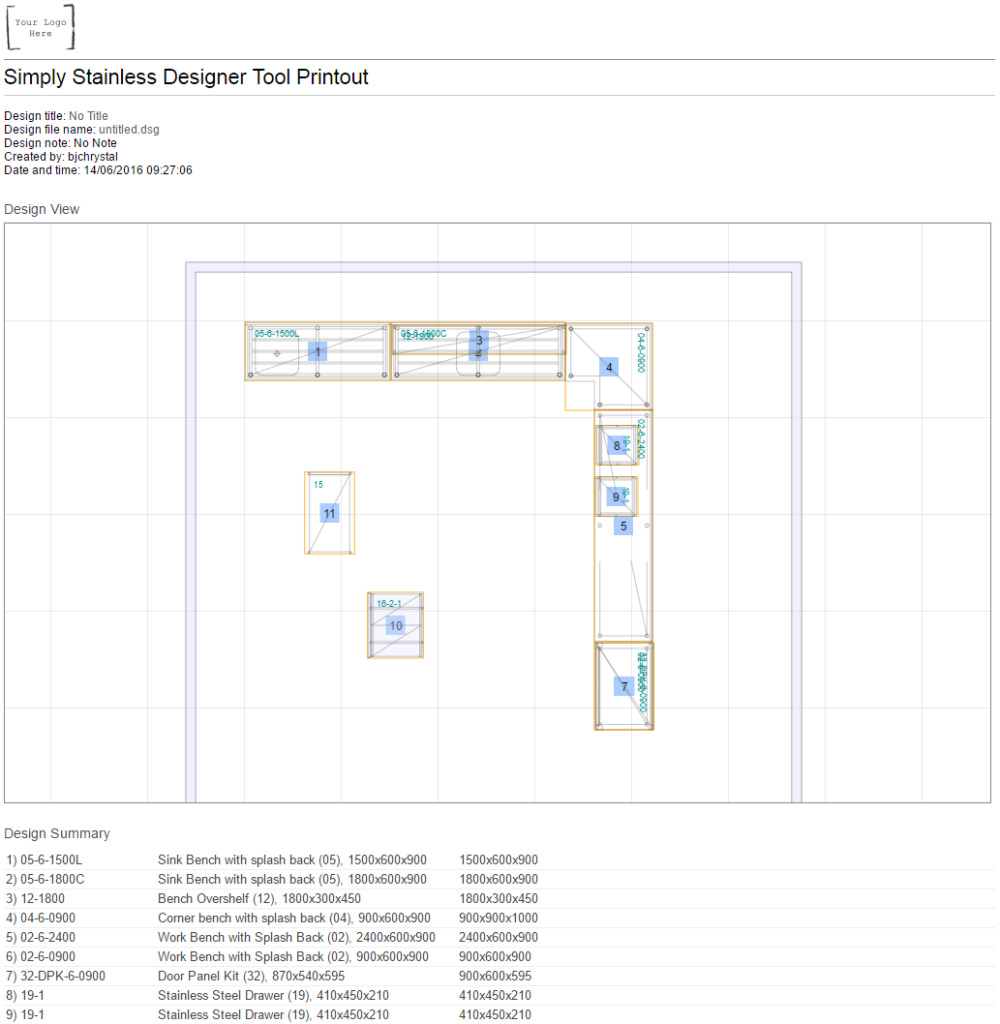
11. 2D and 3D Design Print Process
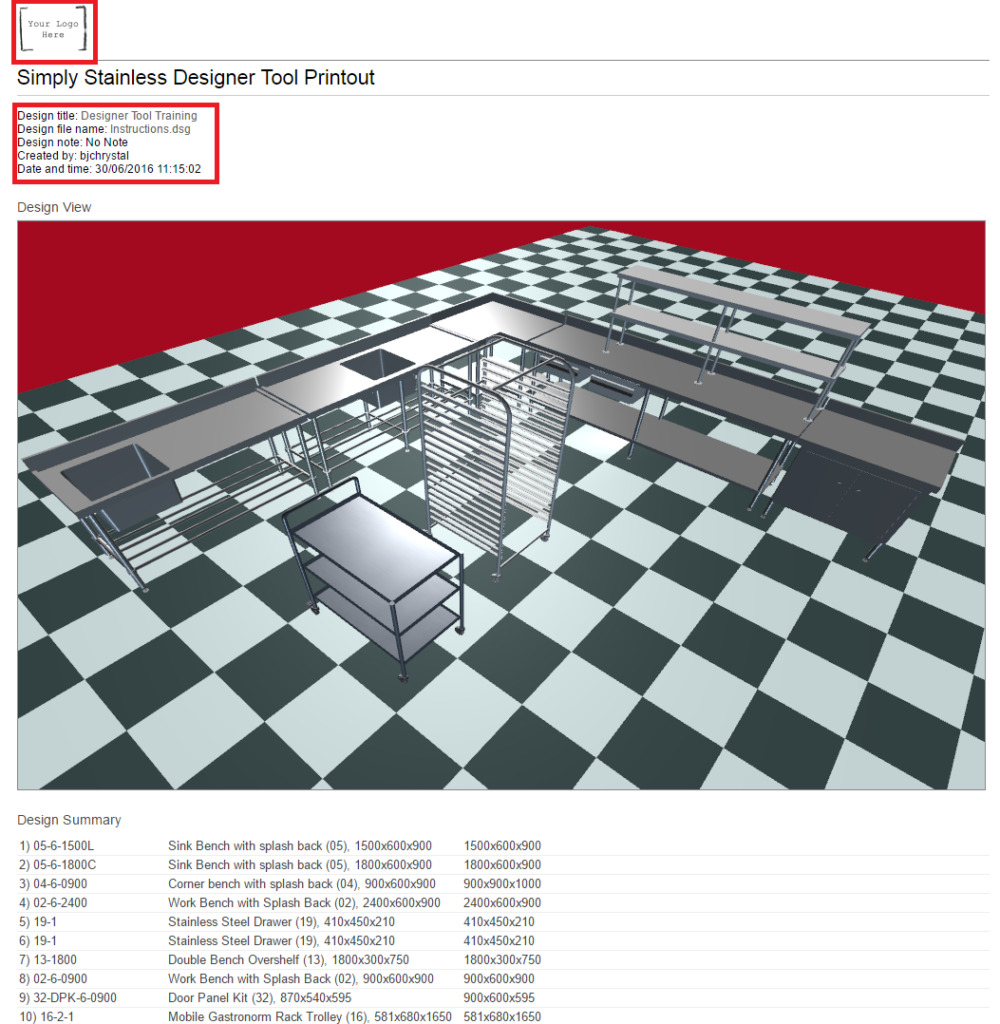
The Print Icon at the top left corner of your canvas (adjacent to the 3D view icon) will open a new window for the 2D and 3D view as seen below. It will show the last view your camera was set at.
Once the print screen window is open in a new tab, you can input your uploaded company logo and other important file information (date/time, file name, title etc.) in the top left-hand corner of the canvas.
Be sure to enable browser pop-ups.
- The top right-hand section of the screen provides you with 2 options – Download a PDF or Email yourself the drawing
- This option is available as long as you are logged in with a valid email address.
- The Email option will automatically send the pdf drawing and schedule of equipment in an attachment to yourself for you to then forward to your client.
- In the lower toolbar, click the ‘Get a Quote’ An email will be sent automatically to Simply Stainless head office who will then forward your request onto your closet distributor so they can reach out to you directly.
2D View 
3D View
12. Purchase Simply Stainless Product
Compared to the entire design process, this is actually the easiest step!
Purchase the necessary Simply Stainless product to make your design come to life.
Join our community of happy and satisfied customers and enjoy our lifetime warranty while you’re at it.
Prefer a Video Tutorial?
Love reading but prefer a video tutorial to take you through our 12-Step User Guide? Access our video here.
Smartphones & Tablet – Quick Tips for Using the Kitchen Designer Tool
There are a couple of things to note before you get started. The Tablet doesn’t offer all usual functions so you’ll need to amend the way you select items to place on the canvas.
- Select the item by selecting it twice on the left-hand panel then click once on the canvas and the item will appear
- You can then move the canvas both in 3D view and 2D view using your fingers to zoom and change camera angle
- The user cannot upload a customised logo for the print view screen
- The user needs to ensure that when printing they have access to a tablet compatible printer
- Some tablets have very low memory which means the app will appear to be operating very slowly
Still have questions?
Contact us at info@simplystainless.com and we’ll get you sorted!